Assainissement
( Sewerage & Drainage )
Its obviously vitaly important to have a properly functioning sewerage and drainage system and our installations conform to N/F.
Properly installed they will function flawlessly and protect both your selves and the environment.

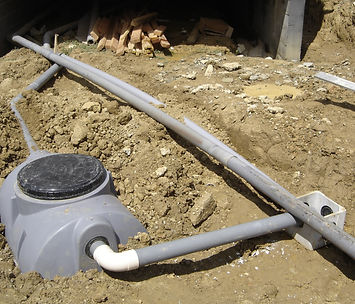
1 Dig Filter

3 Stone

5 Sable special filtrant

7 Sprinkler

9 Geo Textile

2 Fit membrain and collecter

4 Mesh

6 core du filtre

8 Stone

10 Landsape
The Fosse Septique
The series of plates above shows the implantation of a 4m3 fosse and 30m3 filter. Firstly the Filter hole is excavated [usualy at the back
of the site ] Its dug first to alow acsess to heavy lorrys. The hole is lined with a plastic membrain in order to contain the foul water as much as possible. The site should be away from play areas and must be no closer than 35m to any well. A collector made from semi permiable pipes and an inspection chamber is fitted. The pipes are covered with clean washed 10-14 stone this will bear the weight of the sand core preventing the pipes from being crushed but allowing the free movement of water. The stone is covered with a fine plastic mesh this keeps the sand core contained [it would other wise clog the pipes] but alows the free pasage of the filtered water. The sand core consist of 75cm of special washed corse sand this is leveled and covered with geo tex this protects the core from the ingress of dirt. On top of the geo tex is layed the sprinkler, an identical patern of pipes but the reguard is at the other end, this is then covered with stone which is protected by another sheet of geo tex and finaly land scaped . All thats visable are the two inspection lids.
A hole is now dug in front of the filter, big enough to house the Fosse and a trench for a pipe to connect the two. The bottom of the hole is covered with 50mm of sand and the fosse is back filled firstly with sand and then dirt. This is advisable if the Fosse is concrete and essentcial if plastic
Further up the line normaly close to the Kitchen A grease trapp is instaled, this allows the removal of greese before it can reach the Fosse.
[ a film of grease accross the surface of the water inside the Fosse denies the microbes oxeygen and impares there ability to digest]
A gass vent pipe is fitted to the front pipe of the fosse [the highest point] the gass given off during the normal opperation is flamable and unpleasant but as its lighter than air its normaly taken back up the pipe up an outside wall and vented to the air at any point above the roof and above any fresh air inlet[window etc]
11 Grease Trap
13 Hole for Fosse


12 Gass Pipe
Fosse implantation
